I’ve been busy with different projects and traveling, and now the other half of the year has started!
Soon in this July will be my jewelry classes in Milano. The first one, a 3-day New Mokume Gane (NMG) Certification class is open for fully Certified Art Clay Instructors. I followed the training in Japan, and since then the NMG technique has allowed me to create pieces that stand out.

New Mokume Gane Certification projects
Then, the other class is a one-day stone setting workshop. Here is a sneak peek on some new stones I’ve been sorting out that could be used for the projects. With those patterns and colors, imagine what jewelry might come out?
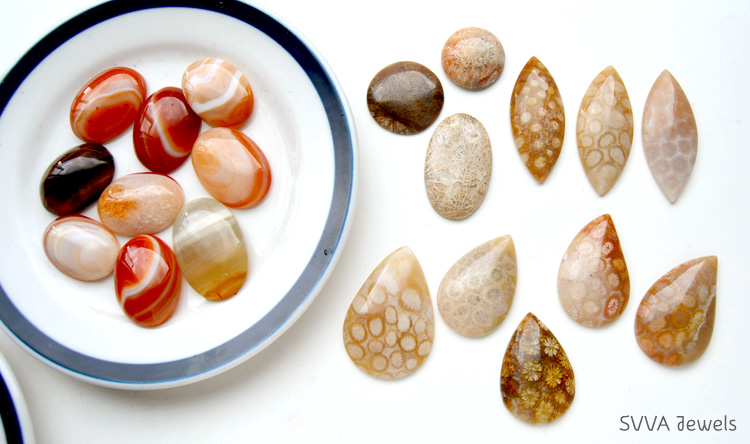
Sorting out yummy natural cabochons of fossilized corals and agate.
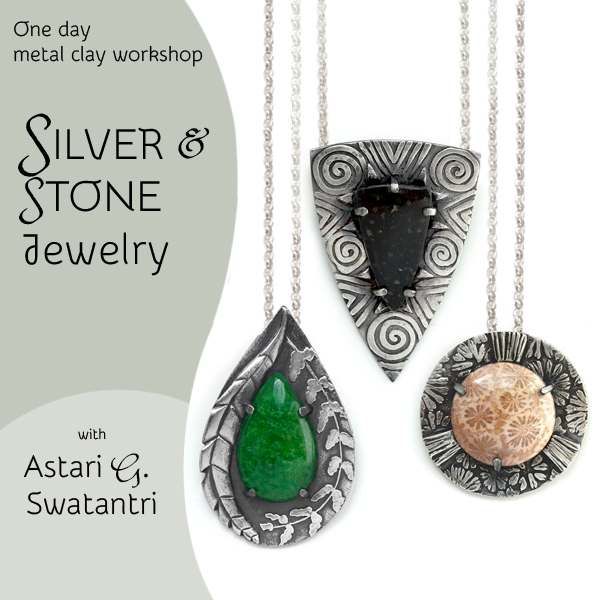
Samples of the silver and stone jewelry.
Meanwhile, I’ve put together a step-by-step process of a silver and amethyst pendant.
This piece combines different elements (the frame, focal point, bail) and I also used a half-drilled stone, so quite many details for a small pendant.
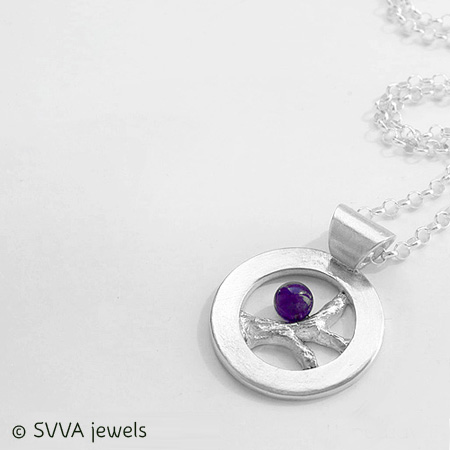
Silver & amethyst pendant.
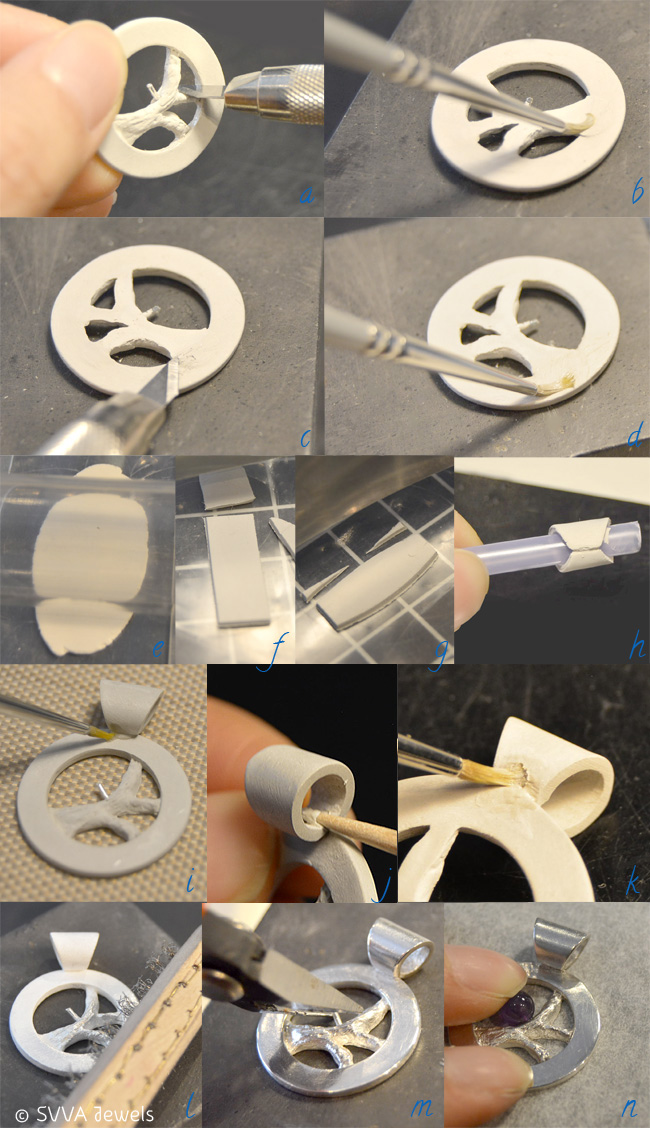
I divided the process into two parts: making the frame and then the rest. I used Art Clay Silver metal clay as the material. Whenever working, I make sure to follow the instructions from the manufacturers of the materials and tools and wear safety devices when necessary. Here’s how I made it :)
Making the Frame
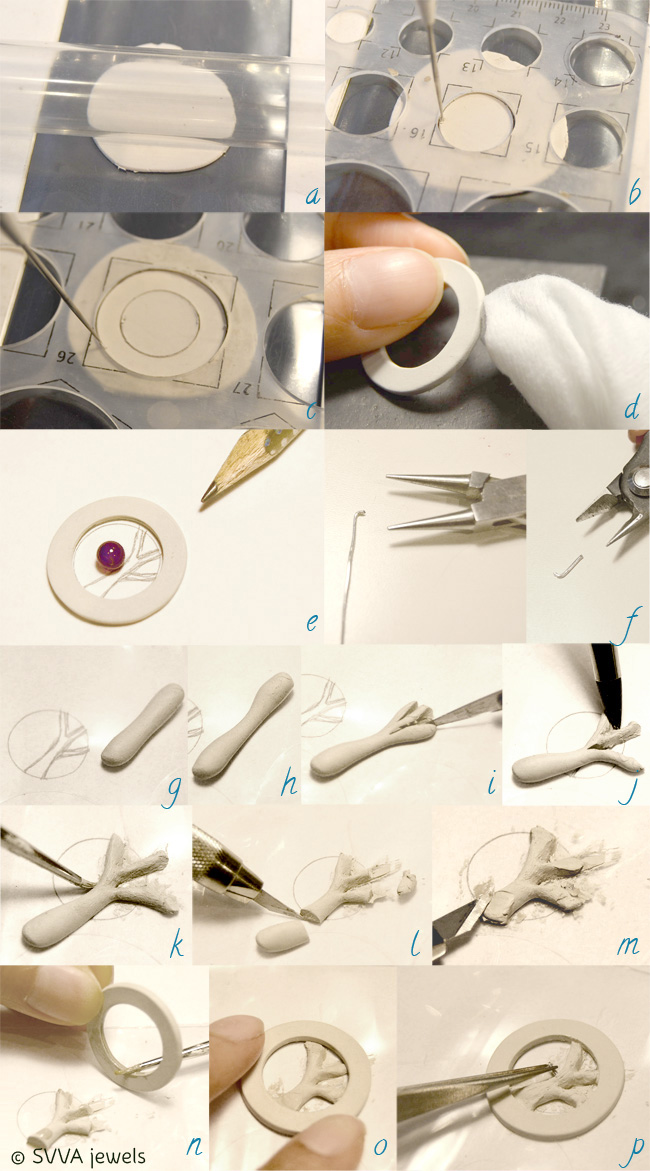
Making the open circle disc
I started by rolling out 10gr Art Clay Silver into 1.5mm thickness (a). Then, using a circle template and a needle tool, I cut out a circle with 16mm diameter, followed with 26mm (c) to create a ring. I dried the piece in the room temperature until the piece was firm enough to be moved to dry further according to the manufacturer’s instruction. I continued with pre-finishing the piece (d), I like to use baby wipes to smooth the silver clay dry surface.
Preparing the Wire
To attach the stone, I used silver 999 wire 0.8mm thick. I started by drawing the branch inside the frame, and planned the stone’s position (e), putting into consideration that the clay would shrink about 10% after firing. I bent about 1mm tip of the wire using a pair of round tip pliers, then cut it about 6mm long using a flush cutter (f).
Shaping the Branch
I placed a clear sheet of plastic on top of the sketch as a reference. Then, I shaped a thick cylinder using 3gr Art Clay Silver (g) which I continued shaping by making the middle part thinner (h). Using a craft knife, I cut one of the thicker ends into three parts (i) which I shaped further into more natural looking branch using a clay shaping tool (j) and a moist brush (k).
Combining the two parts
Using a craft knife, I cut all ends of the branch about 1-2mm longer than the circle line on the drawing (l), then flattened the tip of these ends (m). I moistened the points where the branch and frame will meet using a moist brush (n). Then, I placed the frame on top of the branch, pressing it carefully so both would attach well (o). The last step in this stage, I added a little bit of Art Clay paste and hooked the piece of wire into the branch (p), and dried the piece further accordingly.
Bail, Amethyst & More
Completing the Frame
After drying, I removed any excess clay around the edges of the branch by moistening and cutting it off using a craft knife (a). As for the backside, I moisten the bumpy parts where the meeting points were using a small brush and water (b), then ‘scraped off’ any excess clay as necessary (c), smoothed it using a moist brush (d).
Making the bail
I started by cutting a piece of straw (diameter 5mm) to use as the base to form. After rolling 3gr Art Clay Silver into 1mm thick piece, I cut a rectangle of approximately 20x8mm using a clay cutter (f). Then, I bent the clay cutter slightly so that I could cut the long sides of the rectangle into curved ends (g). I moistened the surface of the clay to avoid cracking and placed it over and around the straw (h). I made sure the ends meet nicely and cut any excess clay with a craft knife. After drying in the room temperature, I removed the piece from the straw and continued drying accordingly and completed the pre-finishing.
Putting Parts Together
On the back of the pendant, I marked the meeting points of the frame and the bail using a pencil. I moistened the marked parts using a moist brush. On a non-stick surface, I joined the frame and the bail using a bit of Art Clay paste (i) and dried the piece. When the piece was dry, I moistened the inner part of the bail and filled any gap with Art Clay Paste (j). I did the same for the back to reinforce the joint between the frame and the bail (k), continued with pre-finishing.
Finishing
Once the piece was ready, I fired it according to the manufacturer’s instruction. When cooled off I washed it under running water. For finishing, I brushed the piece using steel brushes (o) and I highlighted some parts using an agate burnisher. I inserted the half-drilled bead into the wire to see how deep the bead went and used it as a reference to mark the wire before cutting it using a flush cutter (m). Then, I attached the half- drilled bead using a bit of jewelry epoxy glue (n).
Have a beautiful summer (or winter)!
Hope you enjoy taking a peek at the jewelry making process, and this gives you an idea how I made this pendant! Have a great summer (or winter… if you live far in the south! :D) Let me know if you have questions or comments below. Until next time when I’ll share some ‘behind the scenes’ and more posts from the studio.
Vanda Agnoletti
Amo i gioielli di Astari e ho fatto solo un corso con lei da Hobbyland. Mi piacerebbe tantissimo farne altri.
SVVA
Hi Vanda, Thank you so much, so lovely to hear from you! I miss Italy so much, hope to visit and meet up again one day!