This time I’m taking you to my studio.
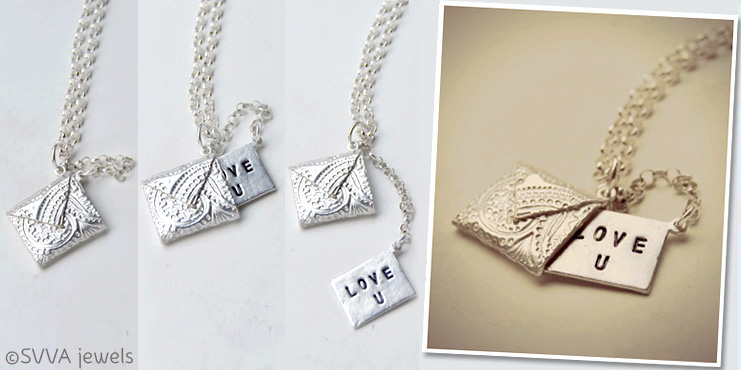
I’ll show you how I made ‘Love Letter’ silver pendant from scratch. In the spirit of Friend’s Day this month in Finland, I wanted to create something that could put a smile on the face :) This pendant consists of two parts, the ‘envelope’ and the ‘letter’, they’re attached with a piece of chain, so I can wear them with the ‘letter’ in or out. Just as I planned it, the pendant is lightweight, which makes it perfect for daily wear.
Wanted to create something sweet, fun, and unique
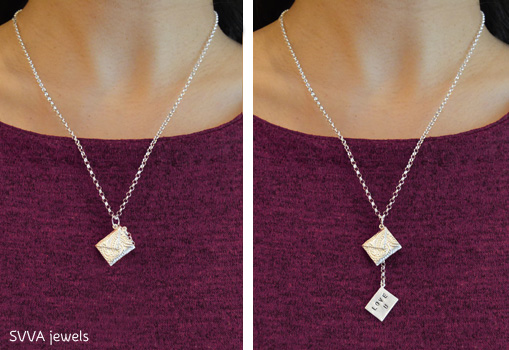
Wearing the pendant with the ‘letter’ in and out of the envelope. Both look nice, however I really like the second option :)
I used Art Clay Silver metal clay as the material for the envelope and letter, also silver jumprings and chain. Whenever working with materials and tools, I make sure to follow the instructions from the manufacturers and wear safety devices when necessary.
So here’s how I made this piece, I split it into two parts: The ‘letter’ and the ‘envelope’.
The ‘letter’
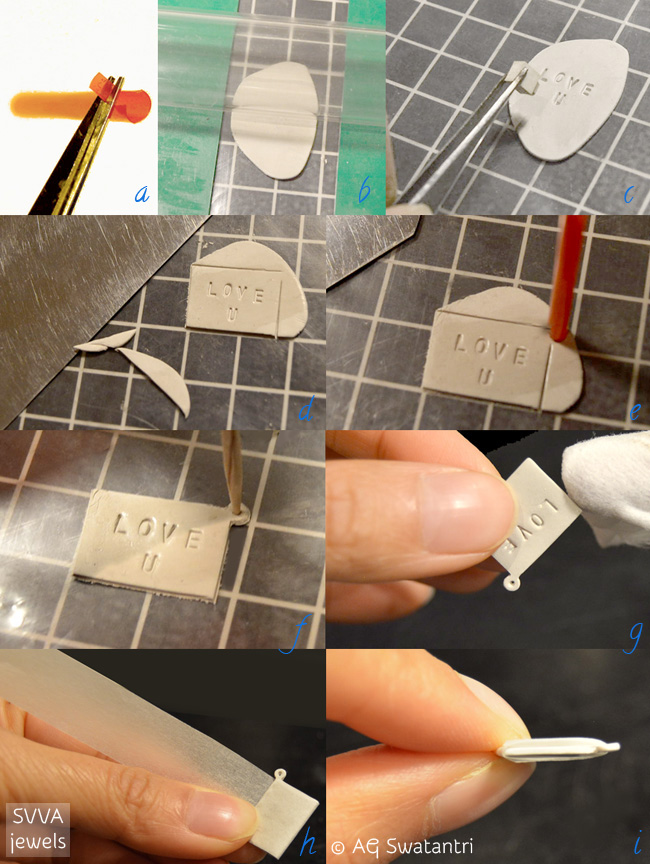
First, I made a little clay cutter out of a piece of straw with 3mm diameter. Using a pair of scissors, I cut away about 1/4 part of the wall, approximately 5mm high (pic a). Then, on a nonstick working surface, I rolled flat about 5gr Art Clay Silver using a roller and 0.75mm plastic strips (b). I wanted to stamp ‘YOU’ but apparently, the letter ‘Y’ had gone missing, hence the ‘U’ :D To prevent the stamps from sticking to the clay, I applied a thin film of vegetable oil on the clay surface, then pressed the letters one by one using a pair of tweezers (c).
I cut the clay into a rectangular shape of about 18x12mm using a steel clay cutter, but I left some space on the right upper corner (d) for the loop which I made using the straw cutter (e) and a toothpick (f). I dried the piece at the room temperature until it’s dry enough to be moved to a dryer to dry further according to the manufacturer’s instruction. Then, I smoothed the edges using a piece of baby wipe, paying extra care to the fragile loop part.
As I would wrap the ‘envelope’ around the ‘letter’, I needed to create space between the two. To do that, I cut parchment paper, or baking paper, with the paper’s width = the length of the letter, and the paper’s length = approximately 6x the width of the letter (h). I wrapped the paper around the ‘letter’ in total 3 layers (i) and carefully press the edges to keep the shape. Then, I carefully slid the paper out of the letter and pressed the paper’s edges one more time before putting it back. This is a little but important step, as to keep the folded shape and to get a nice shape of the ‘envelope’s’ edges later.
The ‘envelope’
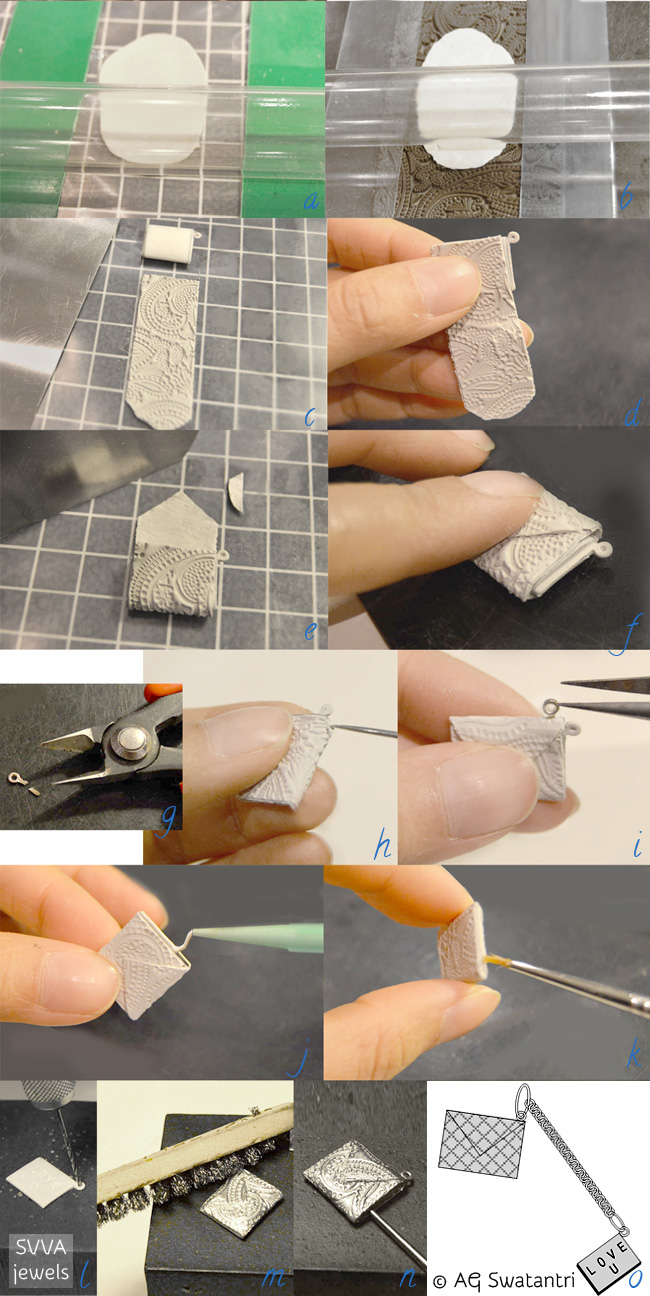
I prepared ahead a texture plate, lightly oiled with vegetable oil to prevent sticking. Usually, I created my own texture for my pieces, but this time I used a commercially available silicone texture plate with nice decorative pattern. I also prepared a small silver 999 eyelet by trimming the end using a flush cutter.
First, I rolled out about 5 gram Art Clay Silver clay using a roller and strips of 0.75mm thick into a longish rectangular (a), which I then peeled and placed on the texture plate. I rolled it out again, this time using a pair of 0.5mm thick plastic strips to create a textured long rectangular of approximately 5x2cm (b).
To make it easy to measure the envelope, on the working mat, I placed the ‘letter’ part with the loop positioned on the right up-corner (h) and then the texturized clay right next to it. I cut the clay into a long piece of 18mm width, trimmed one end but left the other untrimmed. Then, I wrapped the textured clay around the letter to make the envelope. With the loop of the letter still on the right top corner, I positioned the cut edge of the textured clay against the letter (d) then folded it around slightly loosely before placing it on the working mat. I left about 5mm space from the edge of the letter straight and from there cut an angle top to create the envelope flap (e). To ‘close’ the envelope I used a bit of thinned paste of Art Clay Silver (f).
To attach the silver loop finding to the envelope, I poked a hole using a needle tool near the top edge of the envelope (h). I applied a bit of Art Clay paste on the bottom of the finding and inserted it into the hole (i), continued with drying. When dry, I carefully removed the ‘letter’ from inside the ‘envelope’, using a pair of tweezers, and removed the parchment paper away. I then filled the opening on the bottom of the ‘envelope’ using Art Clay syringe type clay (j) and blended it using a moist brush (k) and dried it. I prefinished the piece before firing the piece. There are several ways to fire silver clay, but as usual, I used a jewelry kiln to fire.
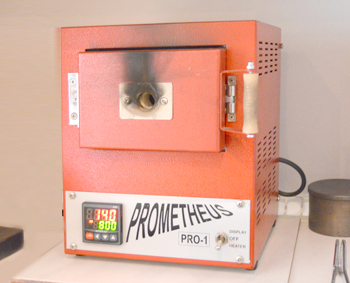
The jewelry kiln I use
After firing, I quenched the pieces and rinsed them in cold water. Finishing process started with drilling the hole on the letter’s loop using a drill (l), polishing with a steel brush (m) and burnished the edges using an agate burnisher. To polish inside the letter, I used a needle type burnisher (n). Then, I cut 3cm long silver chain with round links and attached one end to the letter’s loop using a 4mm silver jumpring and the other end to a 6mm silver jumpring where I also inserted the envelope’s loop. After closing the jumpring I inserted a ready to wear silver chain through. It’s ready!
Hope you enjoyed taking a peek at the jewelry making process and my studio tables and got an idea of the jewelry creation.
Let me know if you have questions or comments below. I will share some ‘behind the scenes’ and more posts from the studio in the coming times.
Grainne
A great tutorial, thank you for sharing 😊
SVVA
Thank you, Grainne! Glad you like it :)
Pamela Williams
I’d love this tutorial I’d like to sign up for your newsletter
SVVA
Thank you and welcome to sign up for my newsletter!
Shona
Thank you for sharing. What a beautiful idea and superb execution.
SVVA
Thank you! Would like to know how did you hear about my page, it would help me to know where to share. I posted this first time 4 years ago, shared also on fb.